


My name is Keith and my wife and I live in Southern Illinois where we hunt and raise Whitetail Deer. I am also starting my own taxidermy business. We love everything about Whitetails and spend a lot of time with the ones we raise (when its not hunting season of course) The deer we rasie are our pets and we are starting a small breeding business to try and recoup some of the costs of keeping them. Currently we have 2 grown does and we are bottle feeding 2 buck fawns and 1 doe fawn. We are in the process of expanding our deer pen to accomadate a few more deer. This blog is going to be dedicated to all things Whitetail. I will be posting on the different aspects of rasing deer, hunting deer, and doing taxidermy. During hunting season I will be keeping up to date on what I see and what I shoot.
>
Monday, October 1, 2007
About this Blog
Bowhunting starts today!!
Fianlly the long awaited season has arrived! It is of course HOT for October, it will be in the 80's today. I hope to go hunting after work today. I will keep everyone updated on what I see.
As for the deer we own....they are all doing well. I am almost done with the pen expansion and the herd will have lots more room to run. I will still have to build another run in shed for them and for storing straw and hay. I have hay and straw on order and will be picking it up this week. We are going to set up straw bales for a few windblock areas around the new pen. i also bought some shade cloth that I will be putting up once the fence is totally complete so the deer have a little more windblock, shade, and protection from things outside the pen. The shade cloth is almost 6 feet tall and will help the deer from running into the fence. Their pen is up against a field and the Combine scares them to no end. I hope the shade cloth will help protect them from some harm. We are also having a lot of people stopping on the road to look at the deer and we hope that shade cloth will deter this.
HAPPY HUNTING EVERYONE!!!!
Monday, July 23, 2007
Fawn update
Our doe fawn just turned 8 weeks on Sunday, Our first buck fawn will be 8 weeks on Wednesday, and our little runt will be 7 weeks on Friday. We have cut out noontime bottles for the 2 bigger fawns and they are doing well. At noon I am feeding them Purina Deer Chow pellets mixed with some soybeans and corn. I also give them a little alfalfa hay and clover. They are all grazing on the greens and the 2 older fawns are eating the pellet mix everyday. I will now start to cut out their nighttime feeding and once that is gone, the morning feeding. They should be weaned at 12 weeks of age. We will then transfer them to the big pen with our 2 does. I think they will be just fine. Little Runt may take longer to wean. Although he is eating greens well, he is not interested in the pellet mix yet. He will eat apples from our hands and clover as well. He is still very small and weary of human touch, but I think he will also be fine. It will be interesting to see if ever cathes up in size and what his antlers will look like compared to our big buck fawn Sammy.
Wednesday, July 18, 2007
Making a European Skull Mount
The European skull mount has been around for many years. In the past, the hides were removed and the skull was left outside to rot and be bleached by the sun. There are a few newer methods out there, including one that uses dermestid beetles. The method below is quite popular and fairly easy to do.
First skin the hide off the skull. Once this is done, remove all the meat and tissue from the skull by boiling the skull. Pick a pot that will allow the skull to be completely submerged. Remove as much of the meat and tissue off before you put it into the boiling water. This will help to hurry the process of cleaning the skull. Be careful not to let the antlers get under the water when boiling, which will cause the antler bases to fade in color. Once the water is boiling, add 1/2 cup of sodium carbonate (washing soda). This helps release the meat and turn it into a jelly which can be scraped off the skull fairly easy. It also helps to bleach or whiten the skull. This will take some time and may require putting the skull back into the boiling mixer more than once. Clean as much off as you can. When it gets difficult to remove the tissue it’s time to place it back into the boiling mixture. Repeat as often as necessary. Don’t forget to remove the brain matter from the little hole in the rear of the skull (the place where the neck attached to the skull). It’s very important to remove all the meat and tissue from the skull. If you don’t do this, insects will get into the skull and may damage the skull.
Once all the skull is clean it’s time to soak it in hydrogen peroxide. Try to find 12% hydrogen peroxide. Don’t confuse this will the 3% that you find at most stores, it will not work very well. The 12% hydrogen peroxide can be found at high end hair solons or you can order it from any taxidermy supply company. Leave the skull in the hydrogen peroxide for two to three days. Make sure to move the skull around once or twice a day. Another more natural way is leave the skull set out in full sun. This will bleach the skull out in a couple weeks. This will also bleach out the antlers themselves. If you don’t want to bleach the antlers out cover them each individually with a black trash bag. Put tape tightly around the bases to keep the bag on. Whatever is covered will keep its natural color. When the skull is as white as you want it, it’s done.
The last thing you can do to your skull is to seal it. This is not necessary but it will make your skull last that much longer. I have a couple skulls that I never sealed that are still in perfect condition 10 years later. I have several that are sealed and they are great also. Its your choice. You can find sealer it at any hardware store or any store that sells paint. A clear spray sealant is what you need.
Once you have decided whether or not you want to seal your skull you will need to decide if you want to mount it to a plaque or if its time to glue the jaw to the skull. If it’s a bobcat or bear skull (any skull that you would want to keep the bottom jaw attached) you may want to epoxy the bottom jaw onto the skull. If it’s a whitetail skull you will not want to keep the bottom jaw attached.
There are other methods of making a European skull mount. This is a method that I have used for years and have had great results with. Once complete, these European mounts look like a work of art.
Carbon Impact Arrows...my review
I have used Carbon Impact fat shaft XLT arrows for 7 years. In my opinion, they have several strong points and only one negative point to them.
First of all, carbon arrows have the perfect weight. There are different sizes to account for different draw weights and draw lengths. I used the 6000 size shafts. At 8.2 gpi (grains per inch) they are light enough to get good speed, yet heavy enough with the combination of the arrow weight/speed. I get good penetration with these. Lots of kinetic energy means two holes and that means larger and shorter blood trails. I get complete pass-throughs nine out of ten times. I use large diameter mechanical broad heads and still get the pass throughs, whether it be at five yards or forty yards. These arrows are also strong. They are not indestructible but they are very durable. Several times I used the same arrows to harvest several deer. I harvested eleven deer with the same arrow one year. If your getting pass-throughs, then your arrows will remain in one piece, Simple as that!
I have used both camouflage and the plain black fat shaft XLT arrows. I have had almost the same results with both. The only difference between the camouflage and the black that I noticed was that the camouflage was quieter on my arrow rest when drawing my bow back. When they came out with the slick, shiny finish on the camouflage arrows it made them even quieter.
These carbon arrows have a nock called the roto-nock. It seems to makes things more accurate. The nock is so tiny it makes it hard to robin hood your arrows. The roto-nock can be turned to where you want it. Line your vanes up how you want by turning the nock. Since the roto-nocks are so small it does make them easier to crack off compared to a nock that slides into the rear shaft. They do however make other nocks other than the roto-nock. You choose what nock you want.
I have noticed one thing that I don’t like about these arrows that was not always so. I used to be able to get these arrows very easily. I could find them in archery catalogs such as Bass Pro shop or from Cabela’s. The local archery pro shops all carried them. If you needed some more Carbon Impact arrows all you had to do was go get them. If you wanted them cheaper than retail all you had to do was go online. I bought several dozen on Ebay for half what I was paying for them elsewhere. Now, since no one carries them anymore, they are a pain to get when you need them. The easiest way to get them now is to buy them directly from Carbon Impact. You can visit them at their web site at http://www.carbonimpact.com/.
My over all review of the Carbon Impact XLT arrows is that they are a wonderful product. As I have said, I have used these arrows for years now and have harvested several wild boar and over 60 whitetail deer using these arrows. To say I have had great luck with these arrows would be an understatement and would highly recommend them to anyone.
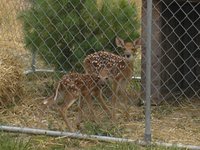
Tuesday, July 17, 2007
Our deer
We are in year two of raising deer. Currently on our little farm we have:
5 yr old doe named Kathy. She was given to us and is a little shy.
1 1/2 yr old doe named Mae. She was our first deer and we bottle fed her.
We are bottle feeding 2 buck fawns (Samson and runbt)and 1 doe fawn (Bella)currently. We plan to get a breeder buck before the rut so that we can have our does bred this year. We had a nice buck that had to be put down last year because my neighbor's dog ran him into the fence and he broke his jaw. At full capacity we plan to have about 12 deer. We are wanting 2 breeder bucks and the rest does.
Monday, July 16, 2007
Blood trailing a Whitetail Deer
There are many exciting events in the life of a Whitetail deer hunter. Not only is shooting an animal exciting, but blood trailing can also be a lot of fun. Blood trailing a Whitetail deer depends on many factors, including what kind of shot you took on the deer. There are 8 main places that you can hit on a deer, and the location of the hit depends on how long you need to wait before recovering the deer.
If you double lung a deer, this means puncturing both lungs(generally a broadside of quartering away shot) you will most likely be able to see your deer go down. I have had to track a few double lung hit whitetails that didn’t go down within my site. These are easy trails to fallow. Pinkish colored blood and lots of it. Sometime the blood of a lung hit deer will have little bubbles in it.. If you notice bubbles it’s a good indication of a lung hit animal. If you only hit one lung. The deer can still easily be recovered. You need to give every animal that does not go down in your site at least 30 minus after your shot. This gives the animal time to expire before you start tracking.
A heart shot deer is much like a double lung hit. You will generally see the animal go down. Requires very little trailing. The deer is dead on it’s feet. Very bright red blood.
Next is trailing a whitetail that has been gut shot. This is a hit that you don’t want to make, but the animal can be recovered if you allow plenty of time after the shot. NEVER TRAIL A GUT SHOT DEER WITH OUT LETTING AT LEAST 6 HOURS PASS! A gut shot deer will not bleed very well. Your arrow will be covered in gut material such as corn bits and other things the deer has eaten. The brownish-red covered arrow will smell very badly. The deer will possibly be hunched and walking slowly as it walks away. They usually don’t bleed right away at point of impact. They general travel 50 to 80 yards before you will start to find blood of the ground. They will try to find a bed within 200 yards and lay down. If you were to start tracking right away or even after 30 minus wait, you will jump the deer up. Pushing the gut shot animal will greatly lessen your chanced of recovering that animal. The deer will run off quickly spilling little or no blood making it almost impossible to find them back. This is why it’s so important to give the deer ample time before starting to trail it up.
A liver shot deer is also easy to recover if handled correctly. The liver hit deer will want to bed down very quickly. Usually with in 100 yards from where the animal was shot. Do not try to get down. The liver shot animal will still very able to run off. It will expire often a lot quicker than a gut shot animal. You need to give a liver shot animal 2-3 hours time before trailing. The blood will be a very dark red color. This shot is in the deer’s middle just in front of the intestines.
Next, is a shoulder shot. This is usually because of a poor shot choice. Never shoot at a deer quartering to you to avoid hitting a deer in the shoulder. If you hit a deer in the shoulder blade if will most likely give you very little penetration. Generally 1 to 4 inches of arrow will be all that goes into the shoulder. I have seen 70 pound draw weight bows go in only a couple inches and other times pass through both shoulder blades and stick into the ground. Regardless of what equipment or weight your shooting you should try to avoid hitting the shoulder blade. The heart and lungs are right behind the shoulder blades and if you do penetrate deep enough you should be able to locate your downed animal quickly.
Lastly, is a leg hit animal. This is a very poor shot. You can recover the animal if everything works out perfectly. This is the only time you would want to push the animal and track immediately after the shot. Pushing the deer is your only hope in recovering it. You will tire the animal out and it will require another shot to put the deer down for good.
Even the best archers mess up if they hunt enough. If you give a wounded deer enough time to expire you should be able to recover it. Wait for those good broadside or quartering away shots. Stay calm and pick your spot…..release!